Apple AirPrint Guide
How do I print from my Apple device to my PIXMA printer?
Please use this guide for assistance when printing from your Mac or iOS device (iPad, iPhone or iPod Touch) to AirPrint compatible PIXMA printers.
AirPrint enables instant printing of photos, emails, web pages and documents from Mac & iOS devices, without the need to install drivers or download software. Simply select an AirPrint printer and print.
To use AirPrint, you will need an AirPrint compatible PIXMA printer and one of the following Apple devices:
Mac
- OS X 10.7 (Lion) or later
- MacOS
iOS (Running version 4.2 or later)
- iPad
- iPhone
- iPod touch
The Apple device and the PIXMA printer that you wish to use must be connected to the same wireless network (sometimes referred to as WLAN). Please view our PIXMA wireless connection setup guides for assistance in connecting your PIXMA printer.
-
Printing using an iOS Device
Please note: The following screenshots have been taken using an iPhone running iOS12.3.1. The layout may differ very slightly from your display depending on your device and the version of iOS you have installed; however, the functionality will essentially be the same.
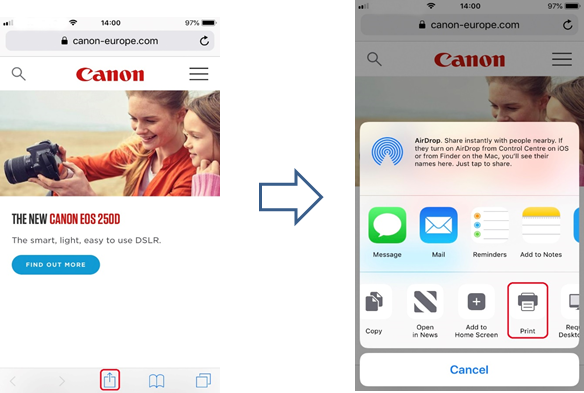
- Check that your Canon PIXMA printer is turned on and connected to the same wireless network (sometimes referred to as WLAN) as your Apple device.
Please view our PIXMA wireless connection setup guides for assistance in connecting your PIXMA printer. - From an app on your device, tap either [
 ,
,  or
or  ] (depending the version of iOS you have installed) to display the menu options, and then scroll across & tap on the [Print] icon.
- From [Printer Options] select the PIXMA model that you want to use.
(In this example, we will use the TS9100 series).
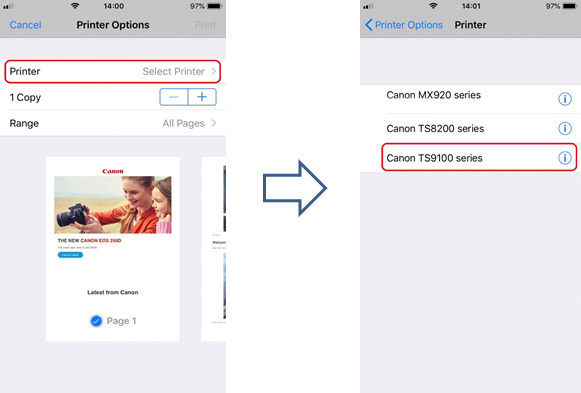
Please note: Ensure that you are within range of your printer. All AirPrint-enabled printers within range will be displayed.
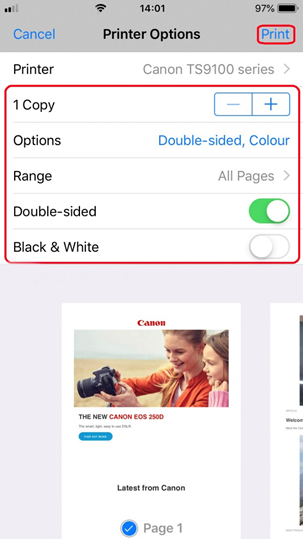
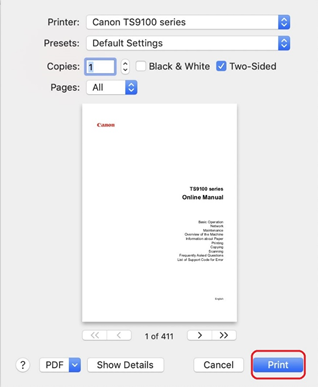
- Select the number of copies you require & tap [Options] if you want to change double-sided prints, colour settings etc.
When ready, tap [Print] to start printing.
Important:
Some apps do not support AirPrint and some printer options may not be displayed. If an app does not let you access the printer options, you cannot print from that app.
Please note:
Printer options can differ depending on the app and printer you are using. Normally, when you tap print and select a model name, the displayed printer options will include up to the following four options:
- Printer: Select a model that can be used on your wireless network or WLAN
- Copies: Select the number of print copies
- Double-sided Printing: If the model supports double-sided printing, you can select On or Off
- Range: The page range can be used only with specific apps and file types (such as PDF files)
- Colour: Select [Black & White] to enable monochrome printing.
- Paper Size: For PIXMA models launched before the second half of 2016, the paper size is selected automatically according to the app being used on the Apple device and the region in which AirPrint is used.
When Apple's photo app is used, the default paper size 4"x6" or KG.
When documents are printed from Apple's Safari browser, the default paper size in Europe is A4.
For printers released after 2016, the paper size directly set on the printer (using the operation panel) is used.
Important:
Your app may support different paper sizesIf you are experiencing issues with your PIXMA printer when using Apple AirPrint please refer to the troubleshooting section of this guide.
- Check that your Canon PIXMA printer is turned on and connected to the same wireless network (sometimes referred to as WLAN) as your Apple device.
-
Printing with AirPrint on a Mac
The look/layout may differ very slightly from your screen depending on the version of operating system you have installed; however, the functionality will be the same.
- Check that your Canon printer is turned on and is connected to the same wireless network (sometimes referred to as WLAN) as your Mac.
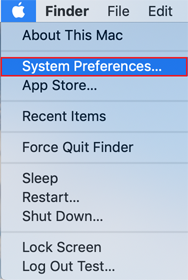
- Double click on the “system Preferences” icon
 or choose Apple menu > System Preferences.
 - Click the “Printers & Scanners” icon.
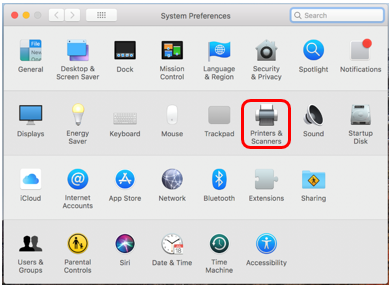
- Click the “+” symbol.
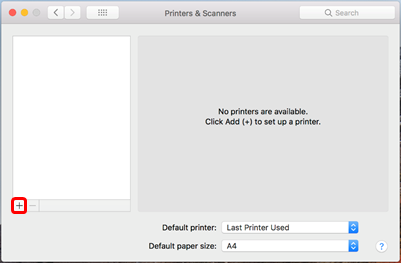
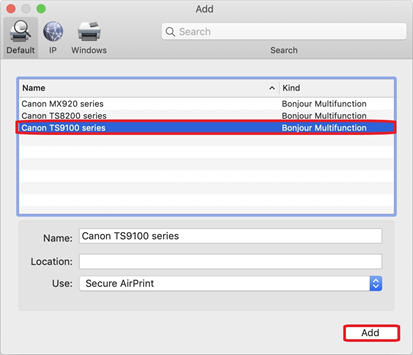
- Select the AirPrint printer you want to add, then click “Add”.
(In this example we have selected the TS9100 series).
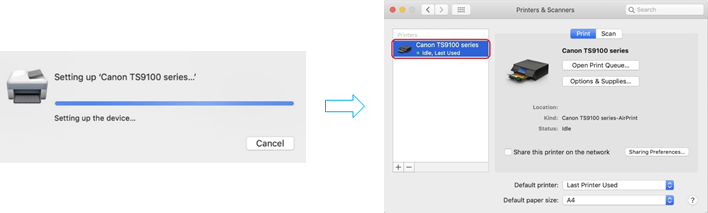
- The selected printer will be added to the printers list.
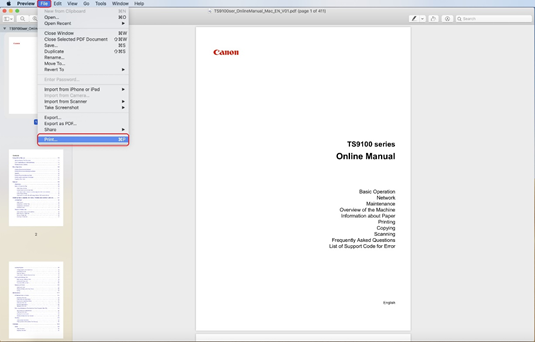
If you are experiencing issues with your PIXMA printer when using Apple AirPrint please refer to the troubleshooting section of this guide. - Once added, to print using your AirPrint printer within an application, simply click “File” & then “Print”.
- With the newly added printer selected, set your required print settings (Copies etc.) & then click on “Print”.
-
Checking The Print Status
During printing the [Print Centre] icon is displayed in the list of recently used apps, which can be used to check the print progress.
- To display the list of recently used apps press the [Home] button on the Apple device twice (For iPhone X, swipe up from the bottom of the screen and pause).
The [Print Centre] icon is displayed. - Select the job shown to see the print summary.
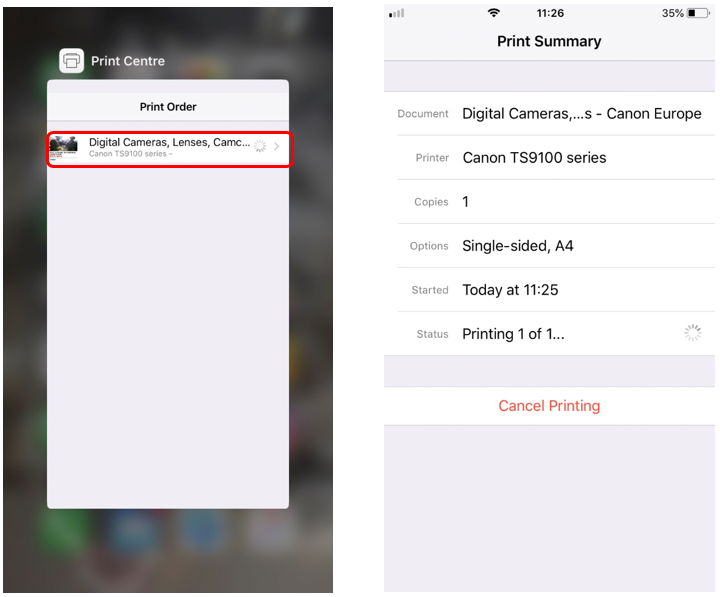
Please note: Print Centre is only available while printing is in progress.
- To display the list of recently used apps press the [Home] button on the Apple device twice (For iPhone X, swipe up from the bottom of the screen and pause).
-
Deleting A Print Job
To delete a print job with AirPrint, use one of the following two methods:
- From the printer: If your printer has an LCD monitor, use the operation panel to cancel the print job.
If your printer does not have an LCD monitor, press the [Stop] button on the machine to cancel the print job.
- From an iOS device: Press the [Home] button twice (For iPhone X, swipe up from the bottom of the screen and pause) and tap the [Print Centre] icon to display the [Print Summary] as shown below.
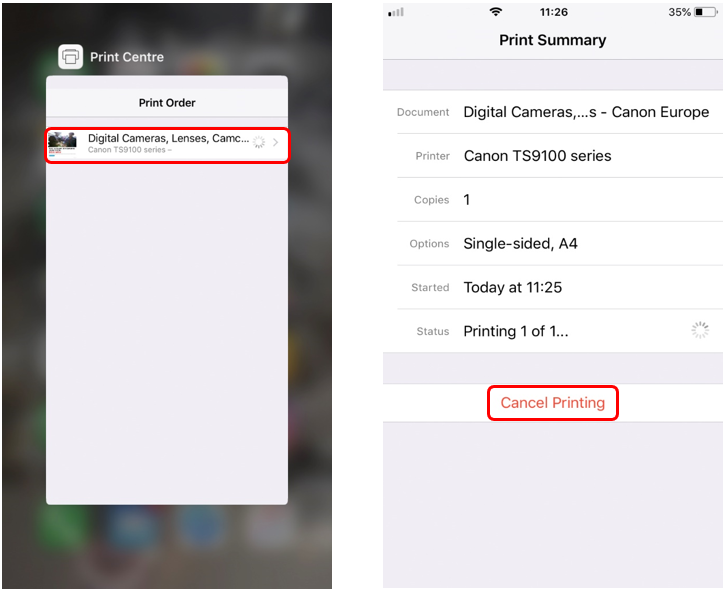
- On the Print Summary screen, you can then tap [Cancel Printing] to cancel the current print job.
If you are experiencing issues with your PIXMA printer when using Apple AirPrint please refer to the troubleshooting section of this guide.
- From the printer: If your printer has an LCD monitor, use the operation panel to cancel the print job.
-
How do I scan to my Mac computer from my PIXMA printer or LiDE scanner using AirPrint?
For scanning documents using your mac, please follow the steps below:
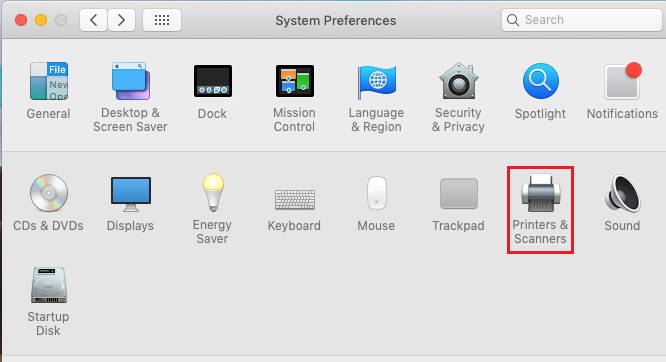
- Click the [Apple] menu:

- Then click [System Preferences]:
- Click [Printers & Scanners]:
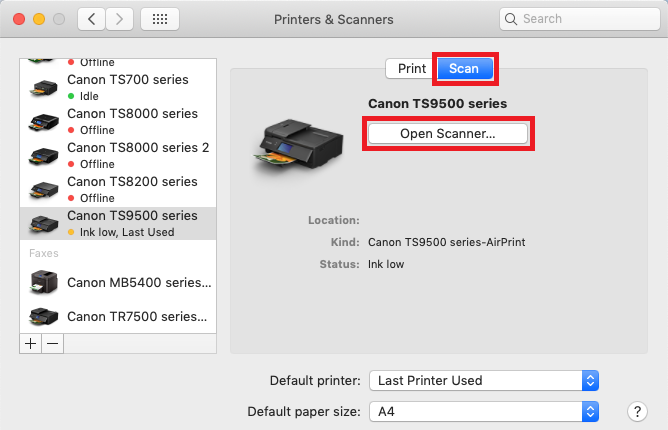
- Click [Scan], then click [Open Scanner]:
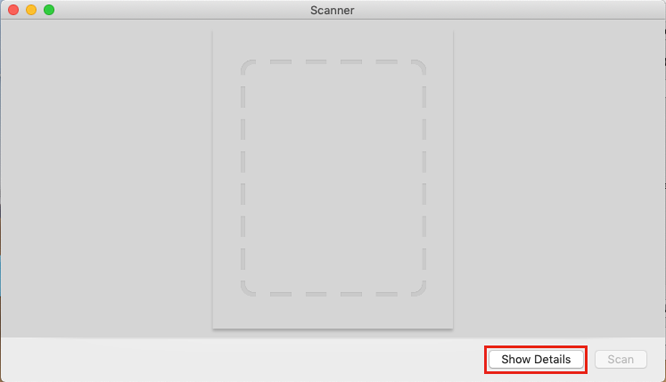
- In the Scanner window, click [Show Details]:
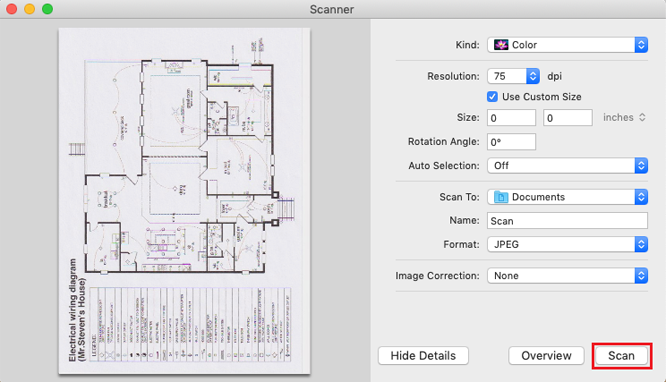
- After the overview scan completes, you will be able to change any settings as required, and then click [Scan]:
- Click the [Apple] menu:
-
If you cannot see your AirPrint printer listed:
- Firstly, ensure that your PIXMA printer is AirPrint compatible by clicking Here.
- After you turn on your printer, it may take few minutes before the printer can communicate through a wireless network (or WLAN) connection. Confirm that the printer has connected to the wireless network (or WLAN), and then try printing. Please view our PIXMA wireless connection setup guides for assistance in connecting your PIXMA printer.
- If the Bonjour service on the printer is disabled, AirPrint cannot be used. The Bonjour service is enabled as default from the factory, so should be enabled unless you have previously made changes to it. You can check the status of the Bonjour service on your printer by printing out the network settings information. The procedure for doing this will vary depending on your model, please refer to your user manual for instructions. If you do not have the user manual, you can download one by selecting your product from the PIXMA range page.
- Verify that you have the latest updates installed for your operating system.
- Some older PIXMA models may require a firmware upgrade before supporting AirPrint. Please ensure that your printer has the latest firmware installed. For details on how to update the firmware, please refer to the user manual for your product. If you do not have the user manual, you can download one by selecting your product from the PIXMA range page.
If the document does not print, please check the following:
- Check that the printer is connected to the same wireless network (or WLAN) as your Mac. Please view our PIXMA wireless connection setup guides for assistance in connecting your PIXMA printer.
- Check that the printer has enough paper and ink.
- If your printer has a LCD monitor, check that no error message is displayed. If an error code/message is displayed, please view our PIXMA error codes and messages page.
If you are still experiencing issues with your PIXMA printer when using Apple AirPrint please contact us for further assistance.
-
AirPrint Troubleshooting (iOS)
If you cannot see your AirPrint printer listed:
- Firstly, ensure that your PIXMA printer is AirPrint compatible by clicking Here.
- After you turn on your printer it may take few minutes before the printer can communicate through a wireless network (or WLAN) connection. Confirm that the printer has connected to the wireless network and then try printing.
Please view our PIXMA wireless connection setup guides for assistance in connecting your PIXMA printer. - If the Bonjour service on the printer is disabled, AirPrint cannot be used. The Bonjour service is enabled as default from the factory, so should be enabled unless you have previously made changes to it. You can check the status of the Bonjour service on your printer by printing out the network settings information. The procedure for doing this will vary depending on your model, please refer to your user manual for instructions. If you do not have the user manual, you can download one by selecting your product from the PIXMA range page.
- Verify that the iOS device is running the latest version of iOS and the app you are printing from is the latest version. Please see the Apple support site for details.
- Some older PIXMA models may require a firmware upgrade before supporting AirPrint. Please ensure that your printer has the latest firmware installed. For details on how to update the firmware, please refer to the user manual for your product. If you do not have the user manual, you can download one by selecting your product from the PIXMA range page.
If the document does not print, please check the following:
- Check that the printer is connected to the same wireless network (or WLAN) as the iOS device. Please view our PIXMA wireless connection setup guides for assistance in connecting your PIXMA printer.
- Check that the printer has enough paper and ink.
- If your printer has an LCD monitor, check that no error code/message is displayed. If an error code/message is displayed please view our PIXMA error codes and messages page.
- If the problem persists, try using a computer to execute printing and check whether the document can be printed normally on the printer. If the document cannot be printed, refer to the user manual for your model.
You can download the user manual by selecting your product from the PIXMA range page.
If you are still experiencing issues with your PIXMA printer when using Apple AirPrint please contact us for further assistance.
Compatible Products
The following products are compatible with Apple AirPrint.
- MAXIFY
- PIXMA E Series
- PIXMA G Series
- PIXMA G540
- PIXMA G550
- PIXMA G640
- PIXMA G650
- PIXMA G1420
- PIXMA G1430
- PIXMA G1520
- PIXMA G1530
- PIXMA G2420
- PIXMA G2460
- PIXMA G2470
- PIXMA G2520
- PIXMA G2560
- PIXMA G2570
- PIXMA G3420
- PIXMA G3460
- PIXMA G3470
- PIXMA G3520
- PIXMA G3560
- PIXMA G3570
- PIXMA G3571
- PIXMA G3572
- PIXMA G3590
- PIXMA G4470
- PIXMA G4570
- PIXMA G5040
- PIXMA G5050
- PIXMA G6040
- PIXMA G6050
- PIXMA G7040
- PIXMA G7050
- PIXMA PRO Series
- PIXMA TR Series
- PIXMA TS Series
- PIXMA TS204
- PIXMA TS205
- PIXMA TS304
- PIXMA TS704a
- PIXMA TS705a
- PIXMA TS3140
- PIXMA TS3150
- PIXMA TS3151
- PIXMA TS3340
- PIXMA TS3350
- PIXMA TS3351
- PIXMA TS3352
- PIXMA TS3355
- PIXMA TS3440
- PIXMA TS3450
- PIXMA TS3451
- PIXMA TS3452
- PIXMA TS3550i
- PIXMA TS3551i
- PIXMA TS3640
- PIXMA TS3750i
- PIXMA TS5140
- PIXMA TS5150
- PIXMA TS5151
- PIXMA TS5340
- PIXMA TS5340a
- PIXMA TS5350
- PIXMA TS5350a
- PIXMA TS5350i
- PIXMA TS5351
- PIXMA TS5351a
- PIXMA TS5351i
- PIXMA TS5352
- PIXMA TS5352a
- PIXMA TS5353
- PIXMA TS5353a
- PIXMA TS5355a
- PIXMA TS6140
- PIXMA TS6150
- PIXMA TS6151
- PIXMA TS6240
- PIXMA TS6250
- PIXMA TS6251
- PIXMA TS6340
- PIXMA TS6340a
- PIXMA TS6350
- PIXMA TS6350a
- PIXMA TS6351
- PIXMA TS6351a
- PIXMA TS7440
- PIXMA TS7440a
- PIXMA TS7450
- PIXMA TS7450a
- PIXMA TS7450i
- PIXMA TS7451
- PIXMA TS7451a
- PIXMA TS7451i
- PIXMA TS7640i
- PIXMA TS7650i
- PIXMA TS7740i
- PIXMA TS7750i
- PIXMA TS7450i
- PIXMA TS8140
- PIXMA TS8150
- PIXMA TS8151
- PIXMA TS8152
- PIXMA TS8240
- PIXMA TS8250
- PIXMA TS8251
- PIXMA TS8252
- PIXMA TS8340
- PIXMA TS8340a
- PIXMA TS8350
- PIXMA TS8350a
- PIXMA TS8351
- PIXMA TS8351a
- PIXMA TS8352
- PIXMA TS8352a
- PIXMA TS8750
- PIXMA TS8751
- PIXMA TS9140
- PIXMA TS9150
- PIXMA TS9155
- PIXMA TS9540
- PIXMA TS9540a
- PIXMA TS9541c
- PIXMA TS9541ca
- imagePROGRAF
Please be aware that if your PIXMA model is not included on the list then it is not compatible with Apple AirPrint.
For more information please view our FAQ's by selecting your product from the list above. Alternatively if you are experiencing issues with your PIXMA printer when using Apple AirPrint please contact us for assistance.
- iPad, iPhone, iPod, and iPod touch are trademarks of Apple Inc., registered in the U.S. and other countries. AirPrint™ and the AirPrint logo are trademarks of Apple Inc.
You might also need...
Contact Us
Contact us for telephone or e-mail support
Service & Repair
Book a service, send a product for repair, or find out more about our service and repair process
Recycling
Learn more about Canon's Cartridge Recycling Programme
Canon Account
Register your product and manage your Canon account